Windows 7 Wallpapers Gallery - I


Windows 7 Wallpapers Gallery - I, Click the image to Enlarge

40 1 2 3 4 5 6 7 8 9 10 11 12 13 14 15 16 17 18 19 20 21 22 23 24 25 26 27 28 29 30 31 32 33 34 35 36 37 38 39

download_button

SAMSUNG SCX-4200 reset to refill old Toner


SCX-4200When the level is near to the end, the printer gives error and stops.


In other words, it disallow you to use all the ink; in addiction of this, you can’t use compatible toners because they doesn’t have the chip, so the printer doesn’t restart even after you replace it.


The complete procedure to enter the service mode of your Samsung SCX-4300 printer, flash it and reset the ink counter.


DISCLAIMER: as usual, I am not responsible for any damage you can cause with this procedure!download_button

  • First of all, download the software pack: SCX-4300.rar and extract it in your hard disk (C:\), creating a C:\scx-4300 folder;
  • Now fire up a command line window: click Start -> Execute…, type CMD and press enter;
  • In the black command line window type cd / and press enter; then type cd scx-4300 and press enter again;
  • Type fix4300.exe SCX4300_V1.13_Fact_romdl.hd and press enter; this script will create a new file in the folder, named FIX_SCX4300_V1.13_Fact_romdl.hd. This file is created starting from the unique serial of your printer, and it will replace the original one in your printer flash memory.
  • Let’s go to service mode: press the following buttons on your SCX-4300 panel:MENU
  • COPIES
    <
    >
    MENU
    >

  • You have to execute the entire sequence quickly! If nothing “strange” happens, just press “STOP” and redo it.

  • If everything is done, you should see “TECH MODE“ in the display of the printer;
  • Press the “MENU” button, follow these steps: DATA SETUP -> FLASH UPGRADE -> LOCAL, then press “OK”;
  • Go back to your computer: you’ve to drag and drop the file we created before (FIX_SCX4300_V1.13_Fact_romdl.hd) to the icon named usbprns2.exe)
  • The display on Samsung SCX-4300 should say:
    - Data receiving
    - Flash erasing
    - Flash Programming
    - Checksumming
    - Download Ok
  • Then the printer will reboot. You unlocked it!
  • When the printer is ready, just repeat the sequence you used before to enter the “TECH MODE” and follow these steps: DATA SETUP -> CLEAR COUNTERS -> CLEAR ALL CNT.
  • The status LED on the printer should become yellow, then finally green. Now you can print again, using all the remaining ink!

Gtalk Tips N Tricks | Gtalk Cheats


Gtalk cheats | Useful Gtalk tips and tricks | complete Gtalk cheats
You can edit most settings by opening regedit (start -> regedit),
and navigating to the key HKEY_CURRENT_USER\Software\Google\Google Talk.

The "Google/Google Talk" key has several sub-keys that hold different option values:
Accounts:

This one has sub keys for each different account that has logged in on the client. These keys have different values that store the username, password and connection options.

Auto update: Stores the current version information. When the client checks for updates it compares Google's response with these values. If an update is needed, it will download and update the new version.

Options: This is the most interesting part, where most of the current hacks should be used (keep reading).

Process: Stores the process ID. Probably used by Google Talk to detect if it's already running or not.

1.) HKEY_CURRENT_USER\Software\Google\Google Talk\Options\show_pin
If 1, shows a "pin" next to the minimize button that keeps the windows on top of all the other open windows when clicked.
2.)HKEY_CURRENT_USER\Software\Google\Google Talk\Options\view_show_taskbutton
If 0, hides the taskbar button, and leaves the tray icon only, when the window is shown
3.)HKEY_CURRENT_USER\Software\Google\Google Talk\Options\away_inactive
If 1, status will be set as Away after the specified number of minutes.
4.)HKEY_CURRENT_USER\Software\Google\Google Talk\Options\away_screensaver
If 1, status will be set as Away after the specified number of minutes.
5.)HKEY_CURRENT_USER\Software\Google\Google Talk\Options\inactive_minutes
Number of inactive minutes to become away if auto-away is on.

More Tips & Tricks
Change the font size -

While holding the control key, move the scroll wheel on your mouse either up or down. This trick works while being focused in either the read or write area.

Insert line breaks - If you want to have a message that spans multiple paragraphs, just hold shift and hit enter. You can add as many new lines as you want to create

Bold Text - To write something bold, you can use an asterisk before and after the word, like *this* .

Italic Text - To use italics, use an underscore before an after the word, like _this_ .

Switch windows - Hitting tab will cycle through open windows. It will select minimized conversations, to expand them just hit enter. If you just want to cycle through IM's and don't care about the buddy list, control-tab will do that and will automatically expand a minimized conversation if you settle on one.

Invitation Tips - You don’t need to say Yes or No when someone wants to add you as a friend; you can simply ignore it, the request will go away. (On the other hand, someone with whom you chat often will automatically turn to be your friend, unless you disable this in the options).

Show Hyperlinks - You can show your homepage or blog URL simply by entering the it in your away message (at the top of the main window). It will automatically turn to a link visible to others.
A message can be 32767 characters long.

How To Conference Calls : What you need to do to have conference calls: Open up a copy of Google Talk on all computers with which you wish to conference. After one copy is opened make a new shortcut for Google Talk but at the end of it add /nomutex. If you installed it to the default folder then your shortcut should read "C:\Program Files\Google\Google Talk\googletalk.exe" /nomutex. Open 2nd instances of the software on every user's computer.

After this start a chain:
1. User 1 should connect on one instance to user
2. User 2 will connect on his second instance to user
3. User 3 will connect using his second instance back to user 1.
With this chain everyone is connected to everyone.

Keyboard Shortcuts Ctrl + E - It centralizes the selected text, or the current line.
Ctrl + R - It justifies to the right the selected text, or the current line.
Ctrl + L - It justifies to the left the selected text, or the current line.
Ctrl + I - The same thing does that Tab.
Tab - It is giving the area to each of the windows opened by Google Talk.
Ctrl + Tab - The same thing does that Shift + Tab .
Shift + Tab - The same thing does that Tab but in reverse.
Ctrl + Shift + L -Switch between points, numbers, letters, capital letters, roman numbers and capital roman numbers
Ctrl + 1 (KeyPad) - It does a simple space between the lines.
Ctrl + 2 (KeyPad) - It does a double space between the lines.
Ctrl + 5 (KeyPad) - A space does 1.5 between the lines.
Ctrl + 1 (NumPad) - It goes at the end of the last line.
Ctrl + 7 (NumPad) - It goes at the begin of the last line.
Ctrl + F4 - It closes the current window.
Alt + F4 - It closes the current window.
Alt + Esc - It Minimize all the windows.
Windows + ESC - Open Google Talk (if it's minimized, or in the tray)
F9 - Open Gmail to send an email to the current contact.
F11 - It initiates a telephonic call with your friend.
F12 - It cancels a telephonic call.
Esc - It closes the current window.

If you have several Google Gmail accounts you also may want to run multiple instances of Google Talk This is especially important for families that share a single PC. Nothing worse than a family member signing you out so they can sign in under their own account!

Basically, to have "Google Polygamy" you need to run Google Talk with the following switch: /nomutex
Step 1: Right-click on the desktop
Step 2: Select New
Step 3: Select Shortcut
Step 4: Paste this into the text box:
"c:\program files\google\google talk\googletalk.exe" /nomutex
Step 5: Click Next and choose a shortcut name such as Google Talk1, Google Talk2, or something related to your Gmail account for easy remembering which account is which.
Step 6: Click OK

More parameters for Gtalk Start -> Run Here’s a complete list of what you can do with Gtalk in run command prompt.
"C:\Program Files\Google\Google Talk\googletalk.exe" /parameter
/nomutex: Open more than 1 Gtalk.
/autostart: Check the registry settings to see if Gtalk needs to be started. If the “Start automatically with Windows” option is unchecked, it won’t start.
/forcestart: Similar to /autostart, but forces Gtalk to start.
/S upgrade: Used when upgrading Google Talk
/register: registers Google Talk in the registry, includig the GMail Compose method.
/checkupdate: check for newer versions
/plaintextauth: uses plain authentication mechanism instead then Google’s GAIA mechanism. Used for testing the plain method on Google’s servers.
/nogaiaauth: disables GAIA authentication method. The same as above.
/factoryreset: set settings back to default.
/gaiaserver servername.com: uses a different GAIA server to connect to Google Talk. Used for debug purposes only, there are no other known GAIA servers.
/mailto email@host.com: send an email with Gmail
/diag: start Google Talk in diagnostic mode
/log: probably has something to do with the diagnostic logging
Adding a web URL in custom message will result it to be clickable.
Gtalk supports these following emotions and they are in blue colors
:-| :-O :-x :-P :-D ;-) :-( :| :x ;-| ;-O ;-x ;-P ;-D ;-) ;-( ;| ;O ;x ;P ;( B-| B-O B-x B-P B-D B-) B-( B’( BO Bx BD B) B( B)
Gmail talk supports these following emotions and they are animated
:-| :=P :-D ;-):-( ;-) B-)

How To Make An Invisible Folder in XP


This is for all you people that have stuff to hide… good stuff..
hide-folder-3.jpg

Back to the tutorial – An invisible desktop Folder. So you basically need a folder with a blank icon and no name.


Here is how to create one:


1. Create a new folder. This doesn’t work with a used or renamed folder.


2. Right-click the folder and choose rename. Press 0160 on the num pad while holding down the Alt key. The name should disappear and be replaced with a blank space.


3. Right click the folder, choose Properties, select the Customize tab and choose Change icon. Select a blank icon space.

hide-folder-4.jpg

How to create fake shutdown viruses


I'm going to show you how to create fake viruses! Just for fun!


BXP25992

1 Introduction
Want to prank your friends and shutdown their computer? Look here to see how. NOTE:it just shuts down it doesn't kill memory, programs, ETC.
Any tips for me? please post a message. thanks!


2 Start
Ok if you want to be as diabolical and evil as me, here is what you do. First, right click on your desktop and click new shortcut


3 Type location of the program
Ok, now you must type the location of the program. there should be a blank new icon and another window shall open. in the text box within the window type...


shutdown (space) -s (space) -t (space) (seconds you want to give the person before their computer starts to shutdown) (space) -c (space) (start quotation mark) (message you want to give them when the countdown sequence is running) (end quotation marks)

after that press the next button.

Eg:  shutdown -s -t 5 -c "Hey Buddy its Cool"


4 Name the program
Now it should ask you to name the icon. the name will show up to whoever you send it to and it will also be seen on your desktop. if this is for a prank that you will send to someone else then i suggest you name it like a game or a real program.


NOTE: you will need to be able to find the picture of the game/program you say later.


5 Change the shortcut icon
Now, you must change the icon of the shortcut. right click on the icon and select properties.
Now click change properties. it is on the lower half of the screen.
then another window will open . click browse and look in your CD drive. there should be your game/program icon. click it and press ok. after you click ok it will return back to the last window. click ok on that one as well.


6 Finished!!!
Now your "Fake Virus" is done. all you have to do it send it to people through an instant messaging service, e-mail, ETC, and laugh hysterically. if you send it through an instant messaging service always watch them log off a few seconds later. its always hysterical.


TIPS:
*make the game/program sound convincing to the victim
*don't send it to people that would sue you
*send it to a friend or at least someone you know (much easier)

Have fun! And laugh! Drop you comments below.

Trick to Increase your internet Speed


Here i will show you the simple trick to increase the speed of your internet connection in the network.

Kommt durch jede Tür
Follow the simple step illustrated below:-
Go to desktop->
My computer-(right click on)->properties->
go to HARDWARE tab->
Device manager->
Now you see a window of Device manager then
go to Ports->
Communication Port(double click on it and Open).
After open you can see a Communication Port properties.

Go the Port Setting: Now increase your "Bits per second" to 128000 and change the “Flow control” to Hardware.

That's it Apply and see the result.

Create PDF Files from Microsoft Office 2007 Document


You can create Portable Document Format (PDF) file from Microsoft Office 2007. PDF is a fixed-layout electronic file format that preserves document formatting and enables file sharing. You can save as a PDF file from a Microsoft Office 2007 only after you install Microsoft PDF Add-in.
Cheap Microsoft Office Standard 2007 FULL VERSION
How to Install PDF add-in from Microsoft To create a PDF file from a PDF file your must install PDF add-in for Microsoft Office 2007.
To install this add-in go to this link and follow the instructions on that page. After install PDF add-in, you can export your file to PDF.

Download Plug-in here
down 
Click here to download the Plug-in

How to Create PDF file Create PDF file from this add-in in easy. Follow these steps to create a PDF file from Microsoft office 2007 :
* Click the Microsoft Office Button, click Save As and then click PDF or XPS.
* Type or select a document in the File Name list, and then In the Save as type list, click PDF.
* Last Click Publish to Create a PDF file.

DIVX via XBOX / HDTV


Setup your Xbox 360 over the network and with the help of Window player 11 you can share all the Divx movies over the network and watch them on your HDTV or regular TV


Setup Diagram

Prerequisites:
1. High Speed Internet

2. Windows XP or Vista with Windows Media Player 11 Installed with usual Divx codec.

3. Home network should have been setup through My Network places. (I think more users know how to do it)

4. Make sure your Xbox 360 is turned on and connected to your home network by wired

Setup from PC


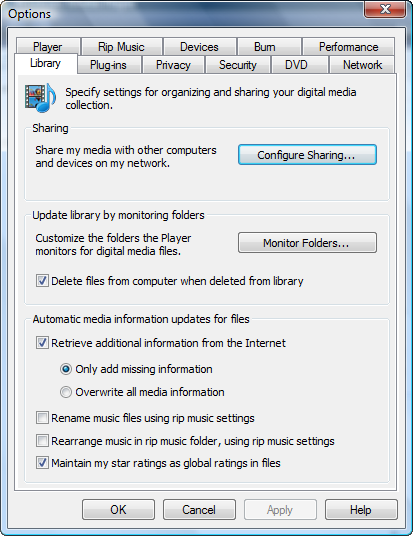
1. Windows Media Player 11
2. Click the Now Playing button at the top of the Windows Media Player 11 interface and choose More Options.
3. On the Library tab of the Options, click Configure Sharing.
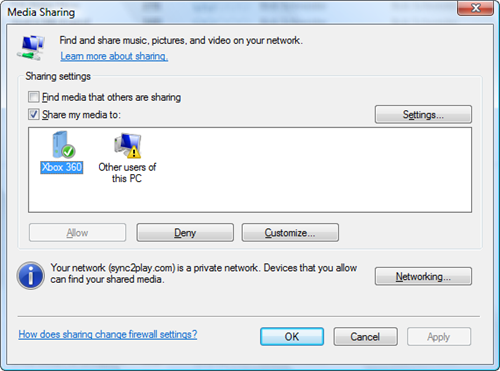
4. Check the box next to Share my media to, and then select your Xbox 360 and click
5. Allow, so that there's a check mark on the Xbox 360 icon instead of a warning sign. Note: If you get an error message about your network, follow steps to set your network from Public to Private.


Setup from XBOX 360:
1. On the Media blade on your Xbox 360, choose Videos, and then hit the X button to Change Video Source.
2 Select your computer from the list of choices.
3. You can now browse your computers music, photos and videos.
4. Depending on how your files are encoded, you may be prompted to download an additional free update for AAC playback with some files ( If you signed in via free Xbox live account)
Conclusion:
This will really help a lot to watch all the movies you are downloading on your TV. Before I used to transfer the file to USB and play in my Divx Player.