How To Earn Money From Google Adsense


Adsense is a program that allows us to place an ad in you website or blog. The ads is from Google and if the ads is clicked by other peoples that visit you site or blog(of course), Google will pay you for the clicks. The most peoples visit the ads and clicked, the most you paid. Let's start!

1. You must have a gmail account first, if you don't have just go to mail.google.com and signup. Then comeback here.

2. After signup for gmail you must have website (or) blog to place the ads. If you have a website just go to the next step. If you don't have money to make a website, just make a blog from Blogger.com its free. Its quiet nice, easy to customize and edit. Just go to Blogger.com and use your Gmail account to sign up, like me. You must make your blog as interesting as possible to make many peoples visit your blog. And you must make them visit your ads. It's pretty though, but if you keep updating your blog with high quality content it's pretty nice. You can store your blog with your diaries (or) experience, even a magic trick!! If you done with the Gmail account and the blog, then we will go to the final step. Ready for it?

3. Go to www.google.com/adsense or type "adsense" in google search engine, then follow the instruction. Fill the field with your real identity, or if you are under 18 you can make it with your parents identity. Of course with their permission!! If you done with your adsense, then start promoting your blog (or) website to your friends, your relative, your family, your parents/children friends, even a STRANGERS. OK, have a nice blog and a nice money from Adsense. I hope your succeed can be my succeed too.

How to Earn from the internet?


Where's George?There are several ways to earn from the internet. But you have to remember that there is no special trick or quick rich set up to do this. If anyone says that they have a product that will let you earn while just sitting around after buying their program, then most likely its a scam. To earn from the internet takes effort and time as well as knowledge on how use the internet for your advantage.

Some ways to earn from the internet are the following:

Blogging - this would be making post from time to time. You can place ads in your blog and earn from them.

Paid to click - there are several sites that pays you when you click some ads. Though they do not pay that high, but this is the easiest way since all you have to do is click.

Affiliate Marketing - certain sites will accept you as a member to become an affiliate marketer. You don't need to have a product of your own to sell. You simply sell the products of others and earn commission for every sale.

Article Writing - several sites pays you to write articles. You simply submit to the site articles that you write basing on different categories and once accepted they will pay you depending on how good your article is.

There are still a lot of ways to earn from the internet. Basically, what is needed is your time and effort. Just like any work, you need to devote time and effort to be successful.

HTML Reference & Tutorial Websites


Hypertext Mark-up Language, more commonly known in its abbreviated form HTML, is the markup language which is widely used to display web pages on the internet.
Below you will find a list of good HTML reference and tutorial websites. This will teach you more advanced HTML techniques and help you to understand the language better.

http://www.w3.org/html/ - World Wide Web Consortium (W3C)

http://validator.w3.org/ - Official W3C validation page.

http://www.htmlcodetutorial.com/

http://www.htmlgoodies.com/

http://htmldog.com/

http://reference.sitepoint.com/html/

http://www.w3schools.com/html/DEFAULT.asp

http://www.tizag.com/htmlT/

Remove Subscribe to: Post Comments (Atom)


Hi all, Hope you are doing fine. Here i explain a small trick in the blogger blogspot. It is very useful when doing customization of your blog.

How to remove "Subscribe to: Post Comments (Atom)"?

Remove Subscribe To Post Atoms from blogger layout that appears at end of page and also after each post individually. Atom feeds work in a very similar way to RSS, and there is very little difference for either publishers or those who choose to subscribe.


1. Go to Dashboard/ Design / Edit HTML
2. Click the 'Expand Widgets Templates' box
3. Find: Press "Ctrl+f"


<b:include name='feedLinks'/> 

Search for the above word and delete the line and Save the Template.

Now check your blog. It is removed now.

Appeal Google Adsense Account


Hi, everyone! I'm going to tell you the method for appealing adsense account. The first time they replied my appeal, they won't change their mind. But, it doesn't make me hopeless. I still try appealing again and again. But, none of my appeal was replied. So I'm send a mail to Google Adsense Support, a mail not an e-mail. This mail include a few important things that help me get my account approve.

These things are :


1. Your biography
Your biography help Google Adsense Team to know your personal identities. It much help when you need extra attention from the Google Adsense Team.

2. Your problem
Write your problem in professional and good language. This will help The Google Adsense Team understand your problem.

3. Print screen of Google Analytics
Login to your Google Analytics and show them that you are not a cheater. Print the visitor, traffic, and bounce rate section. This will help Google Adsense Team know more about your site.

4. About your site
Describe about your site in two paragraph. The first paragraph describing the making of your site. The second paragraph describing your activities in your site and how often do you update it.

5. About your visitor
Tell them about your visitor, where they came from, what part of communities are they, and what kind of human are they. Also tell them about how you promote your website. If you promote through forums then give them the forums url. Or if you promote through Google Adwords, then just write your Google Adwords account data.

6. Your photo
Include your photo and it will help Google Adsense Team to know more about you. Show your saint face and it will touch the Google Adsense Team deepest heart.

7. Handwriting
DON'T print your mail. Just write it with your hand, because it's a gift from God. Don't waste your time, write it with good style. No scratch, no dirty, and you'll be fine.

OK, that's enough, now send the mail to this address :

Google Adsense Support
1600 Amphitheater Parkway
Mountain View, CA 94043 USA

Automatic Read More For Blogger


Automatic Read More Hack For Blogger With Thumbnails i.e expandable post hack for blogger with thumbnail of image used in blogger posts and all this work is done by the script automatically,you just dont need to locate your image the script will do all work for you automatically.Just you have to write your post and publish it with one image in post related to post.
If you dont want to add thumbnail image in post summary then i had an post previously on automatic read more hack for blogger,read this.
Now how to install Automatic Read More Hack For Blogger With Thumbnails Demo snapshot is below.

Lets start with its installation:-
 
Now Login to Blogger Go to Layout > Edit HTML in your Blogger dashboard and check the "expand widget templates" box.
Find the closing </head> tag in your blog template, and paste the following section of code immediately before it:


<script type='text/javascript'>var thumbnail_mode = "no-float" ;
summary_noimg = 430;
summary_img = 340;
img_thumb_height = 100;
img_thumb_width = 120;
</script>
<script type='text/javascript'>
//<![CDATA[
function removeHtmlTag(strx,chop){
if(strx.indexOf("<")!=-1)
{
var s = strx.split("<");
for(var i=0;i<s.length;i++){
if(s[i].indexOf(">")!=-1){
s[i] = s[i].substring(s[i].indexOf(">")+1,s[i].length);
}
}
strx = s.join("");
}
chop = (chop < strx.length-1) ? chop : strx.length-2;
while(strx.charAt(chop-1)!=' ' && strx.indexOf(' ',chop)!=-1) chop++;
strx = strx.substring(0,chop-1);
return strx+'...';
}
function createSummaryAndThumb(pID){
var div = document.getElementById(pID);
var imgtag = "";
var img = div.getElementsByTagName("img");
var summ = summary_noimg;
if(img.length>=1) { 
imgtag = '<span style="float:left; padding:0px 10px 5px 0px;"><img src="'+img[0].src+'" width="'+img_thumb_width+'px" height="'+img_thumb_height+'px"/></span>';
summ = summary_img;
}
var summary = imgtag + '<div>' + removeHtmlTag(div.innerHTML,summ) + '</div>';
div.innerHTML = summary;
}
//]]>
</script>
 

Note in above codes we can change the numeric numbers according to our need


summary_noimg = 430; is post cut height without image
summary_img = 340; is post cut height with image
img_thumb_height = 100; is thumbnail image height
img_thumb_width = 120; is thumbnail image width


Now find this code <data:post.body/> in your template and replace it with below codes.


<b:if cond='data:blog.pageType != "item"'>
<div expr:id='"summary" + data:post.id'><data:post.body/></div>
<script type='text/javascript'>createSummaryAndThumb("summary<data:post.id/>");
</script> <span class='rmlink' style='float:right;padding-top:20px;'><a expr:href='data:post.url'> read more "<data:post.title/>"</a></span>
</b:if>
<b:if cond='data:blog.pageType == "item"'><data:post.body/></b:if>
 

Preview Your template if its showing thumbnail with read more hack Save it.

Applying for adsense & Pasting the ads in the body section


If you have an AdSense account, this latest launch of Google AdSense Referrals 2.0 is something you must look at. In addition to the traditional Google products, there is now a very long and varied list of products that you can include in your Blogs and offer your readers. In contextual ad targeting, the AdSense ads that appear in your Blog may not always be relevant, especially if you do not have a consistent theme in your posts. With AdSense Referrals, you are now able to pick the specific products that you like, and are paid the referral fees. In Blogger.com, it is easy to insert an AdSense for content widget but not a Referral unit. This article will explain how you can fill the “shopping cart”, customize the ad colors, insert the code and have the Referral ads appear just before or after your Blogs posts.

Before we begin, we assume that you already have an AdSense account. If you don't, you can always sign up for a Google AdSense account. AdSense is by far one of the preferred ways of monetizing your Blogs and they have various features which can earn you that extra income and revenue through blogging.

Setting up the Referral ads

1. Country and Language

Login to your AdSense account, click the “AdSense Setup” tab and choose “Referrals”. Somewhere near the top, you will see the default country and language that your Referral ads will be based in. If your readers are mainly from another country or are using another language, change the preferences and click “Show”. Since this is a new feature, some of the languages may see fewer advertisers.

AdSense Product Referrals in Blogger

2. Ad Format

Although you can begin to view the products and add them to the Shopping Cart, it may be wise to set the ad format at this stage. Some advertisers have predetermined ad formats which may not fit into your desired size. Choose the “Ad format” size that you like.

3. Choice of products

It is time to go shopping for the relevant ads. There are three ways you can do that:-

a. Keyword

Enter a keyword that is in line with your theme. You will be shown a list of products that match the keyword (maximum of ten keywords). You can click “Add this keyword to cart.” When you use this option, Google AdSense will rotate the ads to match this keyword and new products will be added automatically without further action at your end.
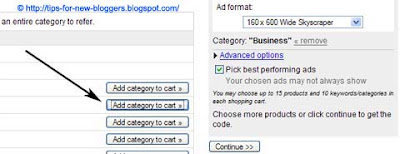
AdSense Product Referrals in Blogger

b. Category

You can browse by category. View the products. If you find a suitable category for your Blog, you can add the entire category to the Shopping Cart. New products in the category will be automatically rotated to show the highest-paying product ads in your Blog. You can have up to ten categories added into the Shopping Cart.

AdSense Product Referrals in Blogger

c. Products

You can also choose the specific products (a maximum of fifteen) to be added to your ad unit. View the products and click the link. You will be shown the referral fees and the terms. There may be different text ad formats and image ad formats that you can choose from. Where the ad size does not fit into the ad unit format that you have earlier determined, you will see a message “This size not compatible with currently chosen ad format.” Choose the one that fits and the product will appear in your Shopping Cart.

AdSense Product Referrals in Blogger

4. Best performing ads

You can tick the “Pick best performing ads” option to have Google AdSense display ads that they believe will bring you more revenue. Since it is based on Google's contextual targeting and analysis, the ads you chose may not be shown.

5. Advanced Options

Click “Advanced Options” and you will be asked to choose a color combination and a channel. Most of us would like the colors to blend with our Blogs. If that were the case, do not use the “Default Google palette” but choose instead any of the “AdSense palettes.” We shall talk about changing the colors later.

You can specify a custom channel to track the performance of these ads. This is particularly useful if you have several blogs and you want to know how well the ads in each blog have performed. Some may want to try out different ad positioning and assign a tracking channel to each of the ad units to monitor the clicks.

AdSense Product Referrals in Blogger

6. Colors customization

Once you are done, click “Continue” and you will be shown the Referrals code that you can add to your web site. The code looks something like this:-


The parts in red are the color codes. You can change the color values and assign different colors to the Referral ad border, background (bg), link, text or url. You may refer to the list of color codes and values or look at your template to find out what colors have been used for your Blog.

7. Placement of code

To insert the code into the Blog, go to Template -> Page Elements -> Add a Page Element either in your sidebar or post body area, and select HTML/JavaScript. Copy and paste the entire JavaScript code and save.

If you would like to have AdSense Referrals appear in every individual post, between your post title and post body, or between your post body and post footer, you may follow this guide AdSense Code in Blogger Post Body, parse the code and place it into the appropriate part of your template.

Under the current rules, you can place up to three AdSense Referral units and three standard AdSense for content units on a single webpage. Therefore, if you have placed the AdSense Referral code into your template, and there are five posts in your page, the ads will only be shown in the first three posts.

50 adsence revenue sharing sites


Advertisement is the best way to sell Ur product. Now a day's Advertisement is covered 90% internet market. Adsence is the logo of Google inc. Google adsence mean internet advertisement provided by Google on publisher's website. There are many sites provided By internet advertisement but Google is Unscramble king of all of them. They cover 80% of all internet advertisement market.

Adsence revenue mean few sites share his adsence revenue to its register members for improve his site tariff and high search engine ranking. This is the best way to make part time money from leaser time. In below I provide the list of 50 adsence sharing sites list.


1- http://www.indiastudychannel.com

2- http://www.indiareviewchannel.com

3- http://www.yousaytoo.com

4- http://www.flixya.com

5- http://www.mybengaluru.com

6- http://www.hubpages.com

7- http://www.articlesrevenue.com

8- http://www.bloggerparty.com

9- http://www.data.net

10- http://www.reviewparty.com

11- http://www.xomba.com

12- http://www.bangalspider.com

13- http://www.delhispider.com

14- http://www.kerelaspider.com

15- http://www.chennaispider.com

16- http://www.mumbaiSpider.com

17- http://www.blogburner.com

18- http://www.wisebread.com

19- http://www.triond.com

20- http://blogevolve.com

21- http://www.about.com

22- http://www.squidoo.com

23- http://www.helium.com

24- http://www.oondi.com

25- http://www.digitaljournal.com

26- http://www.senserely.com

27- http://www.5050articles.com

28- http://www.greendoc.net

29- http://www.daytipper.com

30- http://www.blip.tv

31- http://www.expotv.com

32- http://www.grooveshark.com

33- http://scoopt.com

34- http://www.gearthhacks.com

35- http://www.music-nerds.com

36- http://knol.google.com

37- http://revver.com

38- http://www.thewebmasterforum.net

39- http://www.yourfreeforum.com

40- http://www.scratchprojects.com

41- http://writingcampus.com

42- http://www.break.com

43- http://www.lulu.tv

44- http://www.expotv.com

45- http://www.si-mi.com/

46- http://www.citizenimage.com

47- http://scoopt.com

48- http://tubeimage.com

49- http://www.rateitall.com

50- http://www.valuepay2.com

Join these sites and make good money, happy earnings.

10 best Twitter Tips for Power Users


twitter-logo
The real power users on Twitter are celebrities like Ashton Kutcher, Britney Spears and Kim Kardasian to name a few. Well, if you are to make somewhere near Robert Scoble - make every tweet a magic, you need to go an extra mile. There's a host of things to explore on Twitter. If you are power user looking to make the most of Twitter, there are several cool tips and tricks to take your experience beyond the typical Twitter usage. We sorted out 10 best Twitter tips for power users.

1.  Socialoomph

Even if you have a few hundred or a few thousands, you can manage them with Socialoomph. It offers a host of features that automates your job on Twitter. Some of the exclusive features of SocialOomph includes scheduling tweets, tracking keywords on Twitter, saving and reusing drafts, Bit.ly URL shortening, personal status feed and more. Automatically follow those who follow you and unfollow those who unfollow you.

2. Multiplying followers in Twitter

You need to propagate your Twitter posts on various social networks to get followers.  There's an aggregation service called HelloTXtt that allows you to post once through their interface and propagate the message to all other major microblogging networks like Twitter, Tumblr, Jaiku, Pownce, and a few smaller ones.

3. Blogging/ Twitter Mashup

Most of you must be having a blog. Do you know there are much more people reading blogs that those using Twitter. Why not use your blog for Twittering? There's service called LoudTwitter that allows you take all your tweets for a day, bundle them up into a blog post and publish it on your blog.
Well, you might ask how does it count? We all know Twitter is a real time application, but it's spread across the world. Say for instance, If you are in UK and you have a lot of followers in US and Australia, you can't expect them to go back in timeline to search for tweets posted a night ago. By posting your tweets to your blog you would ensure that you’re readers don’t miss a thing.

4. Tag your followers into groups

Are you using the same Twitter account for your personal or business life. Well, In the current form Twitter has no filters to draw a line between your close friends and potential clients following the same account. You can sort out people that follow you into groups using a simple third party service known as Twitter Groups. It allows you to tag your followers into different groups. With Twitter Groups you will be able to send the message to each person one at a time

5. Build up followers with like-interest

On Twitter you must be looking for people with the same interest as you. There's a Twollow.com service that allows you automatically start following people based on keywords you are interested in.  Simply it's a great way to build up followers.

6. Tweet your status

If you are a Twitter user with lots of friends on Facebook, you can turn your tweets into your Facebook status updates. Twitter has a Facebook application that integrates Twitter feed into your Facebook feed. Once this application is installed your tweets would appear in the news feed of all your friends.  This would allow you exposure without direct followers. What's more, Twitter is smart enough to filter out @replies so that personal messages donation end up on your profile.

7. Handy Firefox Plugins

This is a handy Firefox plugin for any  power users on Twitter. With TwitterBar you can post tweets about web pages you are currently browsing.  Not just the web address, you can also type an additional text along with the tweet as a note. It gets added as a tiny icon into your Firefox address bar. When clicked it will send an update containing everything in the address bar.

8. Timeline for each city

This is a simple but handy idea for Twitter power users. Store the public timeline xml feed. This will allow you to input a specific city to see what’s been said lately by people that live in your city.

9. Fetching latest updates

For any power user Twitter updates are crucial. You can use a simple web application for Twitter updates called GeoTwitter. It is a mashup of Google Maps API and Twitter API. It fetches the latest updates from the public timeline every minute and displays them on an interactive map.

10. Making tweets  keyword-rich

One of the simple tricks that every power user should adopt is optimizing your tweets. Start your tweet with a primary keyword to theme each message. Look for buzz word that would enable you to make the most of timely searches for that issue. However, it doesn't mean you make your message keyword rich without adding value to your tweets. Choose the words that will best convey your message.

Related Post Widget - Powered by Google


Displaying a related posts is a smart way for keeping your site visitors around. and you may have seen other Related Posts Widgets out there.. but this one will be Easier and Smarter. For example: see this site related post. To get this widget to your blogs do follow the below instructions check features list:
  1. Easier : since All of the work is(has to be) done on the client side, You will not need to modify your template at all. widget will read post tags that blogger already display with each post.
  2. Smarter : Cause This widget will list the top related 5(or more) posts sorted by relevancy! Top relevant posts are the posts that have more tags in common with the current post.
  3. More Optimized: Will only use summary feeds instead of querying default feeds that return full contents!
  4. This widget also can work as a recent posts widget when there is no tags to aggregate.
  5. Can be also used to get related posts from another blogspot blog. And in that case you don't have to run it on a blogspot!
  6. A fixed list of tags can be used to aggregate.
  7. It can display loading text or icon until widget is loaded.
  8. Related posts list can be styled based on relevancy!
  9. You can specify either to load widget on document ready or on window load.
  10. Widget will be attached to container specified or it will be placed where you made the JavaScript call.
To see the widget in action, Scroll down to the end of this post. also hover on links to see relevancy tip. This is the complete options table Every variable is optional. exclude it to have default value.
OptionDescriptionDefault value
blogURLOther Blog URL or leave empty to aggregate yours''
maxTagsmax tags to look for on the page5
maxPostsPerTagmax posts to be aggregated per tag5
maxPostsSpecify a max. to remove extra posts that are least relevant or set to 0 to keep them.5
containerSelectorjQuery Selector to find a container to append widget at the end of it, Use 'div.post-body' to have widget appended at the end of your post body. or leave empty so widget is placed where you called it''
tagsdon't specify any and tags are read from page content. or specify a fixed list to aggregate like ['jQuery','JSON']. also setting it to empty array [] will make it work as recent widget all the time.null means not fixed
loadingTextText to be displayed until widget is loaded. for example 'loading..' '' means no loading text
loadingClassCSS class will be set on list until widget is loaded which you can use to style the list with an AJAX icon on the background[ajaxload.info]. for example 'related-posts-loading' '' means no CSS class
relatedTitleH2 Title to be used for related posts widget. To disable title output set this to empty.'Related Posts'
recentTitleH2 Title to be used for recent posts widget when there are no tags on the page. Set this to empty and widget is canceled.'Recent Posts'
postScoreClassA CSS class prefix to be used to style posts based on relevancy. If you set to 'related-link' and maxTags=5 then related links can have classes like ('related-link1' to 'related-link5')'' so feature is disabled
onLoadtrue would insert widget on window load and after all page content(like images) is loaded. or false and widget is loaded after document is ready(before images)false
relevantTipFor demo purpose you can show each post relevancy as a tool tip. set to '\d relevant tags!' and '\d' is replaced with number of tags in common.''
If you want to understand code behind this widget, check [Code behind : A Smarter Related Posts widget for Blogger]. Typical Usage #1 To display related links at the end of every post. copy this code into a new HTML/Javascript widget and place at the bottom of the post or at the footer in the page elements section. Widget uses jQuery v1.3.2, If you already included jQuery into your blog. no need to do it again. <script src="http://ajax.googleapis.com/ajax/libs/jquery/1.3.2/jquery.min.js" type="text/javascript"></script> <script src="http://blogger-related-posts.googlecode.com/files/related-posts-widget-1.0.js" type="text/javascript"></script> <script type="text/javascript"> relatedPostsWidget({ 'containerSelector':'div.post-body' ,'loadingText':'loading...' });</script> [containerSelector : 'div.post-body'] is the default container selector of your post body as output by blogger. which means find 'div' tag with class="post-body" if you unlikely modified it; find your new selector. * Note that: - you should host widget javascript file on your own, Google code has no problem hosting the project javascript files. - You may also try Fileden as it is only file hosting I know that would give you a direct-link (A Must for javascript to work) or you can just upload it to your Google pages(phasing out). But keep the jQuery URL as is, since Google hosts jQuery(and others) very very well. Typical Usage #2 To show related links at the side column. copy this code into a new HTML/Javascript widget and place at the side in the page elements section. Again, If you already included jQuery into your blog. no need to do it again. <script src="http://ajax.googleapis.com/ajax/libs/jquery/1.3.2/jquery.min.js" type="text/javascript"></script> <script src="http://blogger-related-posts.googlecode.com/files/related-posts-widget-1.0.js" type="text/javascript"></script> <script type="text/javascript"> relatedPostsWidget({ 'loadingText':'loading...' });</script> Style Widget with CSS You wouldn't need any CSS unless you need extra customization. Check Project page for more information.. to follow project changes or request features or submit bugs.